Showing posts with label Blogging. Show all posts

Largest Blogger Blog Ko Manage Kese Kare ?-5 Tips In Hindi

blogger-blog
blogger-blog


Hello minders!!! Sabse pehle to aap logo ko ye introduce karva du ki largest blog kissey kehte he? to dosto jis blog me 1000 ya ussey jyada words waale 100 Article ho to ese blog ko hum largest blog keh sakte he. platform chahe koi bhi ho lekin agar materiel badh jaaye tab aapke blog ke andar bahut si soyi huvi chije apna sir uthaati he. kehne ka matlab ye he ki virus,bug ya error jesi chije saamne aati he. me aapko dikhata hu ki kon konsi chije he jissey hamey handle karna chahiye. agar meri baat kare to mere abhi 86 articles he aur jyadatar 700 words vaale articles aapko dikhenge sirf  5% hi article 1500+ words ke likhe he humne baaki saare ussey kam words ke articles he aur tiny articles bhi bahut he lekin fir bhi mere blog ko bhi in chijo se gujarana pad raha he. mujhe iss chij ka experience huva to me samjh gaya ki in chijo ka solution bhi kese karna chahiye.


Largest Blogger blog ko manage kese kare

largest blog ko manage karne ke liye 5 behtarin tips:-1.Apne articles ko daily check kare,2.Bug dhundhe and fix kare,3.Error ko dhundhe and ussey repair kare,4.Upgrade browser use kare and 5.Grammatically mistake check kare


 ☻  1.Apne articles ko daily check kare 


Agar aap Apne blogger blog ka articles daily check karoge to bahut saari problem solve ho jaayegi. issey aapko bug,errors and image ya words ki koi mistake ho chuki ho to aapko pata lag jaayega. agar article post karte vaqt hi aap check karle to accha rehta he lekin fir bhi chhoti si galti reh jaati he is vajah se aapko daily articles check karne ki aadat daalni chahiye. Har readers ko clean and fresh article hi pasand hota he aur ussey blogger ki impression bhi acchi hoti he. blogger to vese hi bahut secure he isliye virus ka hamla kam hi hota he aur password chori hone ke chances bhi kam he agar aapka gmail account suraxit he to fir aapke blogger par attack hone ke chances 0 ke barabar he (issey bhi padhe:- Gmail id suraxit kese kare).
                                                             Sabse jyada jaruri baat ye he ki article likhate vaqt hi savdhani barte. article likhne ke baad usme jo aap words ke andar link add karte he ussey ek baar fir se check kar le. aur ek baat dhyaan me rakhe ki article likhane ke baad ek reader ke najariye se apne article ko read kare aapko bahut saari mistake najar aa jaayegi.


 ☻  2.Bug dhundhe and fix kare 


blogger-blog.jpg

Iss image me aap dekh sakte he ki mene ek Cartoon banaya he ya fir designed words create kare he lekin agar aap esa soch rahe he to ye aap bilkul galat soch rahe he kyuki ye koi cartoon ya designed words nahi he balki ye ek bug he.
"Dar asal bug dhundhana aur ussey remove karna ek esa kaam he,Jese ki doodh ke andar se makkhi ko nikalana"
Bug koi badi problem to nahi he aur ussey hatana bhi easy he. dar asal blogger account me bug jab hamla karta he tab woh link kiye huve word ko target karta he aur ussey aapke word ke andar automatic underline ban jaati he ya fir uski design change ho jaati he ya fir uski jagah par aapko goal chhote chhote dot dikhayi padte he. Harroj article check karne se aapko ye bug jald hi mil jaayega aur aap issey immediately remove kar denge to ye aage nahi felega. ussey remove karne ke liye aapko sirf bug ke oopar 2 step se lekar bug ke niche 2 step select karke issey remove kar dena he. that's it.

 ☻  3.Error ko dhundhe and ussey repair kare


Aapko search console me jaakar Crawl error fix karni chahiye aur URL parameters bhi Edit karne chahiye jissey aapka Blogger blog ka  Search engine rank me badhava ho.

Crawl Error

Crawl Error fix karne ke liye aapko Google search console me Jaakar Crawl>Crawl Errors me jaake error select kare aur ussey mark as a fixed pe click kare.

URL parameters

Google Search console me jaakar Crawl>URL parameters aur fir baari baari se edit kare aur fir "yes:changes,reorders,or narrows page content" select kare aur fir "No URLs" select kare then save kare.


 ☻  4.Upgrade browser use kare 


Upgrade browser use karna bahut jaruri he kyuki old version crash hota rehta he. aur mene khud dekha he ki upgrade kiye bina jab me google chrome use karta tha usme mujhe bahut si problems ka samna karna pada mene dekha ki me ek baar post publish kar deta hu uske baad jab edit karta hu to automatic select all ho jata he,image apne aap move karta he,image words me match ho jaata he,post ke andar alag colors ke words dikhayi dete he and save karne ke baad color change ho jata he to ye sabhi aapke browser ka problem he isliye hamesha upgrade version hi use kare. blogging ke liye Mozila firefox better browser he.


 ☻  5.Grammatically mistake check kare


Grammatically mistake hone par aapko readers ko aap jo samjhana chah rahe he woh nahi samajh payenge. aur aapke readers ko samajhne me bhi problem hogi. isliye iss baat ko har ek blogger ko seriously lena padega kyuki iski vajah se readers ke oopar Blogger ka impression bahot bura padega. isliye grammatically mistake ko bahot khaas dhyaan rakhe and koi bhi article likhne se pehle ek readers ke najariye se check kare aur baad me post kare.
              To aapne iss article me dekha ki kis tarah se ek large Blogger blog ko manage kiya jaata he aur ek blogger ko kin kin baato ko dhyaan rakhna chahiye. agar aapko iske ilava koi largest blogger Blog issue ka solution pata he to aap comment dhvara apni raay de.

You may also like:- keyword research tool-Easy and free way to get more traffic to your blog and website

Iss article ko share kare aur agar question he to comment ke dhvara apna question submit kare
1

Event Based Article Key Of High Site Traffic

site-traffic
site-traffic


Hi minders !!
Many blogger use event Blogging. but according to me Regular Blogging is best. And you can Post Event articles during regular blogging. so i Suggest you use Regular posting with Event articles. many blogger Received million Site traffic by event blogging in short time. So How to start Event Posting ? i Explain.

 ☻ How To choose subject For Event based article

Increase Site traffic in short time trick. Just check your calendar and watch Television news daily. watch sports news or You may also post about upcoming new movie earning report or another sports program. Create list of Upcoming Movies,upcoming Programs,Upcoming Sports match,Upcoming Festivals ETC. so these is ideas for making articles. choose right time to post article. for example 9 April 2016 to 29 May 2016 is a ipl season. so start writing information about IPL cricket match. write article before 2 -3 days of Match. use keywords by Keyword research tool. You may post about match score or player selection and Everything you want to write You can proceed but do not post copy Article of any other bloggers only write your own idea and thinks.


 ☻  How To Write Event based article

So after you Choose subject Start writing article. Write more than 1,500 Words if you want to high rank Of Traffic. minimum 700 Words and maximum 2000 Words Articles are always perform awesome. Set Keyword density 1.5% to 2.0% of Targeted keyword and for other keyword use 8% To 9%,do not Write spam article. if you use one word more than 10%,so it is not better for your article. Set  H1,h2,H3 of your article and always write paragraph and post summary,Update your article daily and make title short,do not write more than 70 characters in title,Use targeted keyword in title H1,H2 and H3,post meta description and permalink. so after you read this you will see Growth of site traffic.

 ☻  Extra tools i Suggest you for Event Based Articles                 

Apply All tools of below for Grow your Site traffic.

Word count tool

This tool help to you For Count word,density check and Check quality. Try it now Word Count tool.

Density checker

In this tool you Can check targeted keyword density. try live keyword analysis tool now.

Fetch as Google

This tool help to you index your new article in Search instantly. You can find this tool In Google search Console. Go to Google search console and go to home>Click on your site>Crawl>Fetch as Google and now Enter your new Article's link after www.example.com/. and then select desktop and click Fetch.next step is choose Crawl only this URL option and click Go that's it .

Traffic,seo and domain checker websites

By this tool Your link will instantly index in search.You can find many Sites of traffic,seo and domain rank checker. For hindi Reader check this Blog for detailed information. also you need to Collect all traffic,seo and domain checker websites then store in notepad. Check Your URL daily in these all websites. Add daily more sites in notepad list and check your URL in both websites Regularly.

                          So in this Post I Explained you about Event based article better for high site traffic. if You need more help about it,then post comment below of your question with detail. and i also suggested you Free tools  To start Posting Event article. and also you learned about seo of it. there are all information tested and then i posted For you. Follow above tutorial and then you will see 100% Result in short time For your site traffic. 

You may Also like:- ussd code how can use ussd code in computer for checking balance,validity and mb-gb-kb data.


Share this Article and Comment below for ask a Question

1

How To Hide Subscribe To Posts (Atom),Subscribe To Post Comment And Below Home Link-In Hindi,Urdu


how-to-hide-subscribe-to-posts-atom


Hello minders!!!
Sabhi log chahte he ki khud ka blog ek professional website ki tarah lage lekin Subscribe to posts atom,subscribe to posts comment and jo niche home likha aata he ussey aapka blog professional nahi dikhega. lekin agar aap issey rakhana chaahate ho to rakh sakte ho iske faayde bhi he ussey aapka member aapki comment feed url se direct join ho jaayega and niche home button pe click karke sidhe home pe chala jaayega. lekin fir bhi agar aap ussey hide karna chahte he to bilkul kar sakte he. aap agar chahe to bina hosting wordpress ya extra mehngi design-theme liye bhi aap apne blogger blog ko Seo friendly,visitor friendly and professional looking bana sakte he. or ye sab Aap totally free me kar sakte he. me aapke blogger ko seo friendly and professional looking banane me madad karunga bus aap Mindedbro par ye sabhi jaankari jaan paayenge. Bus aap daily updates check karte rahiye.
                  Aayiye hum niche "How to hide subscribe to posts (atom),Subscribe to post comment and below home". topic ko discuss karte he.


 ☻  How to hide subscribe to posts (atom),Subscribe to post comment and below home

 Vese sabhi bloggers in dono cheezo ko rakhna pasand nahi karte he kyuki ussey aap ko uncomfortable feel hota he. aur attribution widget bhi 98% blogger rakhna nahi chahte he to ye saari chizo ko aapko hide karna jaruri he. ye teeno chiz hide karne ke liye Ye 2 steps ko follow kare 1.How to hide subscribe to posts (atom) and Subscribe to post comment. and 2.How to remove home in below article.


 ☺  1.How to hide subscribe to posts (atom) and Subscribe to post comment

Sabse pehle aapko ye jaanana jaruri he ki ye dono link aap sirf ek hi code se remove kar sakte he. so aap niche diye gye steps follow kare.

1.Sabse pehle aap blogger open kare.
2.Ab aap Template>customize>advanced>add CSS aur niche diya gaya code copy(Ctrl+c) karle
  
.feed-links {display:none !important;}

3.Ab ye code ko box me past(Ctrl+v) karde.
4.Congrats!!! ab aapka subscribe to posts (atom) and Subscribe to post comment dono links remove ho chuke he.


 ☺  2.How to hide Home-link in below of article

Ye code se sirf post ke niche vala home remove hoga balki header ka home remove nahi hoga isliye aapko tension lene ki jarurat nahi he. to home link remove karne ke liye steps follow karne he jo niche mojud he.

1.Apna blogger account khole.
2.Ab aap Template>customize>advanced>add CSS aur niche diya gaya code copy(Ctrl+c) karle.

 .home-link { display: none; }

3.Iss Code CSS box me past(Ctrl+v) kar dijiye.
4.Congratulation!!! ab aapka post ke niche vala home link remove ho gaya he ab aap uss blank space ko koi bhi widget laga sakte he jese ki social media share buttons,related post etc.  ya fir aap ussey ese hi chhod doge to bhi koi aapatti nahi he.
                           To iss article me aapne jana ki kis tarah se subscribe to posts (atom) ,Subscribe to post comment. and  home link in below of article remove karte he. to ummed he aapne ye teeno links hide kar diye honge. vese dar asal ye remove karna jaruri he kyuki inse blog ka balance nahi rehta he. lekin agar aap hide na bhi kare to bhi aapke liye ye accha he. agar meri baat kare to mene to ye teeno hide kar diye he. kyuki mujhe niche blank space chahiye tha related articles widget Add karne ke liye.to aap bhi iss tarah se koi bhi widget daal sakte he me aapko social media share icons and related articles jesi badhiya widgets daalne ko suggest karunga. kyuki jab bhi aapka visitor article padhte padhte aayega to sidha uski najar post ke niche vaale hisse pe padegi agar vaha pe related post widget hogi to woh sidha another article par transfer ho jaayega. aur agar post ke blikul niche agar social media icons hoge tab aapke visitors sidha post padhne ke baad share kar dega to in dono cheeze add karne ka bahut bada benefit he. aur ye benefit paane ke liye aapko ye teen link remove/hide karna bahut jyada jaruri he.

You may also like:- payza account-how can create payza account without any future verification issue?-you will get fresh payza account.

Iss article ko  share jarur kare !!!!  aur agar koi savaal he to niche comment darj kare.

0

How to add Paypal,Payza shopping cart and order now Option in Shopping blog

order now
Order now


Hello Minders!!!!
Many people have a business of selling clothes,plastics and other items. and you know you can increase your business by online selling in Free. Create Shopping blog and start earning with your own products. you can see my own example:- www.sharmili.in
                  Here I Was not added buy now,shopping cart or order now buttons because Clothes owner not needed it but in future i will use paypal,payza or visa shopping cart option.


 ☻  How to add Paypal and Payza shopping cart-Order Now option

It's simple but you need to keep your mind in this tutorial. follow these two steps. 1.How to add Paypal Order now Option in blog , 2.How to add payza Order now Option in blog. also you can try visa developer and paytm seller for selling your products. I will post another detailed tutorial of paytm seller and visa developer just be patient .

 ☺  1.How to add Paypal Order now Option in blog

Paypal is very popular payment processor in the world. supported in almost all country and easy to use and instant service. check below how to use paypal buy now button. paypal have a restriction in some country for send money.

1.Go to paypal and login to your account
2.Click Paypal buy now button
3.Click create your button now
4. Fill the forum. only fill rounded option check in below screenshot. ignore not rounded.


5. Now click create button
6.Copy(Ctrl+c) the code and go to blogger
7. Go to layout>Add gadget>past(Ctrl+v) here your copied code and now you successfully added paypal buy now button you can also use it in blog post.

 ☺  2.How to add Payza Order now Option in blog

Payza is popular payment processor after paypal. and also payza supported almost all country but payza  restricted withdrawal in some country and take a high fees for withdraw money through bank wire.

1.Go to payza and login to your account
2.Then go to payza payment buttons and click add

3. Now fill the forum

Check screen short below 1.item type:- choose your item. i selected other 2.Type your name name 3.Type your description 4.Type your item code otherwise ignore it 5.select US dollar 6.Type your item rate 7.add your shipping and handling charges 8.Type your website URL 9.add your return URL 10. add Cancel transaction url into your website.(note:- ignore tax and additional charges)


4.Click update
5.Copy(Ctrl+c) the code and go to blogger
6. Go to layout>Add gadget>past(Ctrl+v) here your copied code and now you successfully added Payza buy now button you can also use it in blog post.


 ☺  You may also like                                                                                               

Paytm seller and Visa developer are the best service for seller. read detail Visa getting started guide and paytm guide

So In this article you learned about shopping blog and this is the only guide for the Paypal And Payza Transaction service. but i want learn to you all detailed guide like adding the Order now or Buy now option of visa,paytm and another payment processor. so wait for our new article and now add this two payment processor for sell your products. happy selling with shopping blog !!!!.


You may also like:- health questions about diabetes and heart attack-best home remedies for these diseases-easy way for relief in these diseases

Comment below for ask question and share this article !!

0

Move blogger navigation menu widget above header-Navigation header ke oopar kese move kare in hindi

Blogger navigation menu widget


Hi !! readers. aaj me aapke liye ek bahot hi badhiya tutorial lekar aaya hu jo shayad 80% bloggers bilkul nahi jaanate he. aur ye tutorial hindi me he taaki hamaare hindi-urdu readers ko aur jisko english nahi aata woh log bhi ye use kar paaye Blogger navigation menu widget ko header ke opar lagaoge tab aaapka blog jyada accha lagega aur issey aapke readers ko bhi aapka blog read karne me sahayata hogi kyuki agar aap Blogger navigation menu widget ko oopar ki taraf le jaayenge tab aap ke pass jo sapce bachega usme aap other navigation HTML/CSS widget bhi add kar payenge jissey aapke blog me ek jaan aa jaayegi. aur issey visitors ko bhi aapka blog padhneme aasani hogi.


 ☺  How to Move Blogger Navigation Menu Widget Above Header 

Aap ko in tutorial ko karne se pehle aapko bahut si baate dhyaan me rakhni he kyuki me nahi chahta ki aap apna blog hamesha hamesha ke liye kho de. aapko ye tutorial apne blog me apply karne se pehle apne blog ko Backup karna he. aapke blog ko backup kese karna he woh aap niche step 1 me read kar paayenge. jyadatar bloggers axar ye galtiya kar bethate he woh log bina backup kiye hi apne template ke andar koi bhi kesi bhi trick apply kar dete he jissey agar koi galati hone par aapka blog ki desig change ho jaati he ya fir error aane lagti he ya fir pura pura blog hi gayib ho jata he.... Lolzx
                                                  apke saamne ab do step he step 1:- How To backup Your template  and step 2:- How to Move Blogger Navigation menu widget above header.


 Θ  How to Backup Your Template                                                                        

Jesa ki mene aapko pehle bataya ki aapke template ko backup karna bahut jaruri he taaki agar koi garbad ho to aap instantly aap apna blog vaapis install kar paaye aur apni saari chije vaapis le paaye aur ye bahut jaruri chije he issey bikul bhi ignore nahi kiya jaa sakta. to apne temlplate ko download jarur karle.
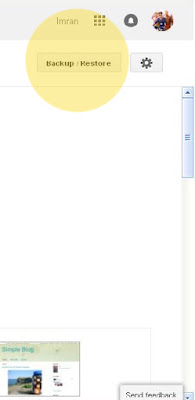
                                              Sabse pehle Blogger me jaakar apna blog select kar uske baad Template option me jaakar oopar right side me ek option hoga Backup/restore. usme jaakar aap download full template pe click karke Download karle.
                                To ab aap template ko backup/restore kese karna he woh aap sikh gaye honge agar fir bhi aapko samjh nahi aaya to aap liye niche Comment ke darvaaje hamesha khule he. asal me HTML body me aap agar koi changes laate he aur koi garbad ho jaaye to bahut hi badi problem ho jaati he saari mehnat aur time barbaad ho jaata he isliye paani aane se pehle deewar khadi kar deni chahiye chahe koi bhi kaam kyu na ho. to Blogger navigation menu widget ko oopar move karne se pehle aap ye baat apne dimaag me utaarle.


 Θ  How To Move Blogger Navigation menu Widget Above Header                      

Ummed he aapne apna template Downoad kar liya he. to ab aap sidhe Template>edit HTML pe chale jaaye vaha pe jaake aapko CTRL+F dabana he aur vaha pe aapko  <div class=’tabs-outer’> code find karna he. jese woh code highlight ho jaaye tab aap <div class=’tabs-outer’>  se lekar  <div clas=’main-outer’> ke aage tak aapko code select karna he. aur dhyaan rahe aapko <div clas=’main-outer’> select nahi karna he. sirf uske aage tak hi select karna he.
                             Ab aap ko pure ke pura code cut karna he. select kiya huva code cut kar le aur CTRL+F dabakar <head> tag search kare. aur ye sara code aapko <head> tag ke niche past kar dena he ya fir CTRL+V dabaaye. ab aapko uss code ke thik niche do aur line add karni he.

<br />

<br />

Ab aap  preview template par click kare aur sab kuch thikthaak ho chuka ho tab aap save template pe click karke save karle. Fir aap ke aapka blog ka navigation bar header ke oopar move ho gaya he. ab aap issey enjoy kare.
         Jyadatar logo ko ye tutorial malum nahi he to isi liye mene ye article add kara he taaki un saare logo ko iss baat ka pata chal paaye aur jissey malum he woh bhi ek baar study jarur karle taaki unki idea taazi ho jaave.
junk files-Problem how to remove junk and temp files by run command ?

Iss article ko  share jarur kare !!!!  aur agar koi savaal he to niche comment darj kare.                                             
0

How to Move blogger header image in Center without adding any widget or HTML coding

blogger-header-image


You can add widget on header left,right and center by CSS/HTML coding. but i have another trick to move your header image to center. Easy to use. and also comfortable for your header.
Note:-You can also move blogger header image to right side by resizing your image.


 ☻  Move Blogger Header Image In Center        

 Today i want to show you about moving image to center in blogger follow these three steps for apply in your blog. Step 1:-Change Header Background to white , Step 2:-Use Paint Program  and step 3:-Uploading image


 Θ  1.Change Header Background To White                                  

Go to Blogger and select your Blog>Template>Customize>Advanced>Backgrounds and Select white color and then click apply to blog for apply changes. see screen short below for check information in detail.

blogger-header-image


 Θ  2.Use Paint Program                                                                   


Use paint program. change your photo size by paint program.  Select your image and open with paint. Increase background size and use select tool for select your image. select your image and move it to right side. and save your image by Ctrl+S.  see screen short below for understand.

blogger-header-image


 Θ  3.Uploading Header                                                                    

Upload header After you completed your paint process. set your image width long for adjust your header. and then upload your image go to blogger and select your blog and then click layout>header>add gadget and then upload your resized image. select shrink to fit and in placement select second option Instead of title and description and click save. all process completed now check your header. if your image not moved correctly then retry and increase width by paint. check screen short below for details.


1.Browse your header image , 2.Select second option instead  of title and description , 3.select shrink to fit and 4.click save.
you can also Add gadget in header right side and left side. but you need to some changes in your HTML/CSS coding. we will make article about that. but this trick is also great for who do not want to use HTML/CSS  and who do not want to add any widget in header. you can also use other color background in header just change image background and header background. add link in header image when you upload header image. have a nice day friends!! thank you for support us. keep it up !!!!!


Comment below for ask a question and must share by below G+,twitter,facebook and pinterest buttons !!!

0

Free me music website banake apne khud ke songs and videos upload and download kare-create own music website free

creat own music website free
how to create own music website free


Aaj jyadatar logo ko music website banane ki puri ichha hoti he sabhi ke man me ek hi savaal hota he ki how to create own music website free???. lekin music website banane me bahut kharcha ho jata he and management karne waale ko bhi paisha dena padta he iske liye hum ye tutorial lekar aaye he ki kis tarah se hum apni khud ka music and videos upload karke khud ki unique website bana sakte he aur usko awesome look de sakte aur in sab ke liye aapko ek payi bhi kharch karne ki jarurat nahi padegi.


  ►  Create own music website free    
Hum yaha par dekhnge ki kese hum puri ki puri website step by step create kar sakte he. aapko niche diye gaye 5 step ko follow karna he. that's it.
Step 1:- Blogger conection
Step 2:- Awesome Music template
Step 3:-Google site
Step 4:- Final tutorial


  ♪    1.Blogger Connection
Aap sabhi log ab blogger me master ban chuke honge sabhi ko malum he ki blogger manage kese kiya jata he bahut hi aasan hota he blogger me site manage karna agar fir bhi aapko blog banane me dikkat aa rahi he to aap ye do article visit karke blog banana sikhle:- 1. blog kese banaye 2.blog kese banaye step two


  ♫    2.Awesome music template
Apni music website ko unique and legit look dene ke liye aapko ek bahut hi jyada attractive template ki jarurat padegi aur ye templates aap ko free me mil jaayenge. ap mera example visit kare jo mene niche diya he. uss example me dekh payenge ki music website ka template kesa hona chahiye.

Example :- Dj-Gujarat

Aap chahe A to Z music download. ki website bana sakte he lekn uske liye aapko kadi mehnat ki jarurat padegi. aa meri www.dj-gujarat.blogspot.in dekh sakte he ye mene website sirf 30% hi banayi he taaki aap logo ko samjh aa sake ki music website kese bana sakte he agar me uss website ko pura karne me lag gaya to me MindedBro.com aur Sharmili.in pe dhyaan nahi de paaunga isliye mene usko sirf 30% hi create kara he taaki aapko ussey kuch idea mil jaaye. aap dekh sakte he ki mene Dj-gujarat me kesa look dene ki koshish ki he aur woh bhi free template daalkar and kuch coding karke. aap bhi ye kar sakte he.
                                                                                     Aap ko sirf niche di gayi websites se sirf kuch free templates download karne he jo bhi music template accha lage woh aap laga sakte he. aur aapko ye article bhi jarur padna chahiye taaki aapko pata chal jaaye ki music template kese upload kar sakte he. How to upload Template in blogger?

Download free music templates

Music template gallery 1

Music template gallery 2

Music template gallery 3

Ab aapko apni pasand ka template mil gaya hoga aur aapne usey upload bhi kar liye hoga ab next step follow kare


  ♪    3.Google site
Google site se aap apna sara material upload kar paaoge and uska aapko link bhi milega. ab niche dekhe ki kis tarah se aap mp3 aur video upload kar sakte ho.
 Sabse pehle aapko Google site open karna he. aur gmail id se login karne ke baad aapko Create par click karna he

creat own music website free

Ab aap  1:- template select kare , 2:-Site ka name likhe , 3:-Site ka link daale ,  4:-Security check kare aur 5:-Create button pe click kare
creat own music website free


Next me Aap ko page create karna he uske liye aapko oopar right side pe create new page ke icon pe click kare.


creat own music website free


 Next 1:-Apna page name daale , 2:-Web page option select kare , 3:- Usme aap put page at the top level option select kare and 4:-create button click kare

creat own music website free

Ab aap ka page create hokar ready ho chuka he apna page select kare aur add files button pe click kare aur ab aap apni mp3 or video file upload kar sakte he.

creat own music website free


Ab aapki site create ho gayi he usme aapke jo bhi mp3 and video upload karne he woh karle aap chahe to do page bana sakte he ek mp3 upload karne ke liye aur ek video upload karne ke liye is tarah se aap do part banakar yaad rakh sakte he. ab aap niche diya gaya detailed tutorial follow kare taaki aapko saari details pata chal jaaye.


     4.Final tutorial
Aapko jesa mene pehle step me dikhaya uss tarah se aapne blog create kar liya hoga. ab aap create kiye huve blog me jaaye ar vaha pe aap ek list banaye. agar aapko a to z song create karne he to a to z ki list banaye aur agar aap step by step create karna chahte he to uss tarah se bhi bana sakte he jese ki mujhe saans (jab tak hai jaan) song ko apne blog me add karna he to sabse pehle aap ye song ka name likhe aur usme uss song ki link add kare usko detail me samjhane ke liye aap niche screen short dekhe.

sabse pehle aap google site>your site>your page pe click kare aur jo bhi song upload kiya he uski link copy karle. link copy karne ke liye song ke right side pe download arrow button pe right click karle aur link copy karle
creat own music website free


Ab aap ne jo song upload kiya he uska name apne blog ki music list me likhana he. 1:-Apna song name select kare 2:-link pe click kare 3:-apni google site me se jo song ka name he us song ki download link past kare ya fir Ctrl+v dabaaye. that's it !!!!

creat own music website free

Aapke pass jo bhi song available he uss song ke name likhde aur google site me song upload karke uske links aapke songs name me add karte jana he. uss tarah se aap saare song upload kar sakte he. Aap is tarah se jitane chahe utane songs add karde aur fir jab bhi aap ke blog ka visitor aapki site pe aake song/video pe click karega tab automatically downloading start ho jaayega.
                                              Iss tarah se aap awesome design ke saath ek professional music website bana sakte he. agar aapko koi savaal he to aap hamse kuch bhi puch sakte he instant reply ke liye comment kare otherwise hum se call,email se bhi baat kar sakte he.

Agar aapko ye Article achha laga he to niche diye gaye G+,twitter,facebook and pinterest se share jarur kare !!!!  aur agar koi savaal he to niche comment darj kare.


ways to earn money online-how to earn money by YouTube ?-Monetize your video in youtube by google adsense
0

3 useful and awesome HTML animation for marquee moving word in blog


I posted all detailed article about moving word,moving image,moving image/word with link etc. so,today i want to teach your= more tricks about marquee. you can check animation for marquee below. also visit our marquee section and learn more about marquee..[....]


fastest internet speed-how to increase internet speed and basic knowledge of netsetter/dongleGo to blogger.com>choose your blog>click new post and try below awesome tricks for animation for marquee

  ☺   1.How to set Marquee Moving Words Alternate Behavior
Go to new post and click HTML section and past below code

<marquee  behavior="alternate">Minded Bro</marquee>

Now  replace words Minded Bro to your Words
 Process completed. Now you can check your preview. see my example below

Minded Bro


  ☺   2.How To add Bold words with Color and background color
 Go to new post and click HTML section and past following code

<marquee bgcolor="#CD5C5C" style="color:Yellow;"><b>Minded Bro</b></marquee>

Now you can replace bgcolor="your color code"  ,  style="color:your color name;" and replace <b>your words</b> 
now check your preview see my preview below

Minded Bro 

  ☺   3.How to add Play/Pause control in moving words 
Go to New post and click HTML button then past this code

<marquee onmouseover="this.stop()" onmouseout="this.start()">Minded Bro</marquee>

Now replace Minded Bro to your text. all done!!
check preview

Minded Bro

You can also add moving image with link,moving text with speed control and moving word with direction control visit our Marquee section


Comment below for ask a question and must share by below G+,twitter,facebook and pinterest buttons !!!
0

Blog ki Traffic boost karne ke no.1 secrets in hindi-get unlimited web traffic-100% Guaranteed

web traffic
web traffic

Aaj me aapko dikhaunga ki Traffic boost kese karte he aur ye tarika jiske pass 25-50 articles he uske liye he. traffic boost karne ke liye title main chij he. title me hi agar aap dhyaan nahi rakhoge to fir web traffic jitana target kiya he utana nahi milega bhale hi aapne article kitana bhi achha kyu na likha ho. so,title likhate samay aapko in baato ko focus karna bahut jaruri he. aur post keyword strategy aap mere iss article me aapko dena chahunga.....[....]


Boost your blog traffic by Below 2 tips


Aapko shayad pata nahi he lekin 80% web traffic aapka title dekh kar aati he. title damdaar to banda pahelwaan.
to aaj me aapko yahi dikhana chahta hu. aapko traffic badhane ka sabse bada formula keyword he aur woh aapko google search console me se ye idea aapko milega.. kis tarah se ??? Aayiye dekhte he....


    1.Web Traffic boost karne ka sabse damdaar formula 


Aap shayad nahi jaanate lekin aap web traffic boost apne Google search console se kar sakte he. aapko shayad ye baat majaak lag rahi hogi. he na? lekin ye sach he. aapko sirf aapke blog ke liye jitane searches huve he un sab keyword ki history ko study karna he.
sabse pehle aapko Google Search Console me sign in karna he. (agar aapne google search console me apna blog submit nahi kiya he to abhi kare or Sitemap bhi add kare )
ab aap ke saamne ek option aayega usme se apni blog/website select kare or open kare.

web traffic
web traffic


Ab aap Search traffic>Search Analytics pe click kare

web traffic
web traffic


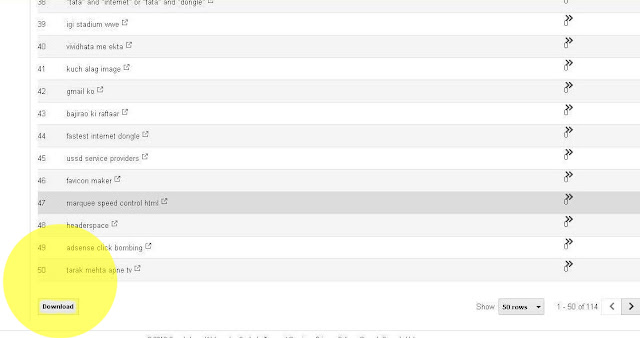
Ab aap ko jo keywords dikh  rahe he un sab ko download karna he to sabse pehle niche cursor le jaaye aur apne saare keywords download karle.


web traffic
web traffic


Ab aap jese hi file download ho jaave vese hi usme se jo keyword sabse jyada search and click huve he(top 10 keywords of your blog) woh dhundh ke note me likh le aur jese hi aap new article likhne jaaye vaha title me,image optimization,permalink,search description aur h1 and h2 heading me bhi issey use kare. aap chahe to aapke blog ke liye jitane keyword search huve he uss keywords me se bhi popular keyword choose kar sakte he. fir dekhe iska kamaal jo keyword already aapke blog me fit ho chuka he woh Google search me top pe rahega. aur 100% traffic boost hogi.


      2.Increase traffic by blogger social media secret tips


 Kya aap jaante he ki aap ke blog ke article ke niche jo social media buttons hote he ussey ignore karne ki aap jo bhul kar rahe he woh bilkul bhi thik nahi he jab tak aap social media pe share nahi karoge tab tak koi bhi nahi jaan paayega ki aapke article me he kya? aur jab tak visitors social media se nahi aayenge tab tak aapka article bhi search me nahi aa sakta. to sabse pehle aapke articles social media pe share karo.

 • Articles Strategy 

:- Ho sake to daily ek badhiya,clear,detailed aur helpful article post kare. and jab aapke 200 article ho jaaye tab 2 days me ek article post kare. next goal aapka ye he ki aapke 400 article ho jaaye tab aap 4 days me 1 article post kare aur ese hi 5-7 days me ek badhiya article apne audience ko de. aur jese hi aap article post kare vese hi niche diye gaye social media button se G+,Twitter,Facebook,Pinterest pe share jarur kare.
web traffic
web traffic


Permalink me kabhi bhi a,an,the,is and are jese stop word use na kare. jissey search engine ignore karta ho.
                                              Ab aapko ek aur social media ki secret baat bataane ja raha hu. oopar jo screen short me  social media icons  dikhaye jaa rahe he woh icons se aap daily sharing start rakhe agar aapke 50-70 articles he to daily subah 3 aur raat ko 3 articles step by step share jarur kare.(Note:- baar baar ek hi article share na kare daily alag alag article choose kare share karne ke liye jissey aapke reader isko spam na maane. isiliye maine aapko pehle hi bataya tha ki ye strategy sirf 30-50 ya ussey jyada articles jis blogger ke pass he uske liye he)
                                                        Ek keyword google search console me se aur ek keyword Google Adword se total 2 keyword  ko title tag,image optimization,search description,permalink,h1 h2 heading me and last me use jarur kare
                             Aur apna article ke andar jo words he uss words me agar aapke dusare article se related koi word he to usme apne dusare article ki link jarur daale ussey aapke articles ek dusare se connected ho jaayenge.
      In sab baato ko dimaag me  lekar blogging karoge to aapki web traffic 100%  badhegi. aur woh bhi 15-20 dino me likh lena meri Guaranty he. ☺☺☺☺☺☺☺☺☺☺☺

wifi net-wifi modem ke liye basic knowledge-wifi modem ke liye kuch jaruri baatey

Agar aapko ye Article achha laga he to niche diye gaye G+,twitter,facebook and pinterest se share jarur kare !!!! aur agar koi savaal he to niche comment darj kare
0

How to add jump break in blog-Set articles like a news

Jump break in blog
Jump break in blog

Jump break in blog-Add jump break in your blog and decrease your blog loading time and make it fast by this tutorial. your can also increase your visitors by this idea....[....]


learning html-blogger/sites me khisne waale shabd/words kese banaaye.


How to add jump break
Go to your blogger and click new post

Jump break in blog
Jump break in blog


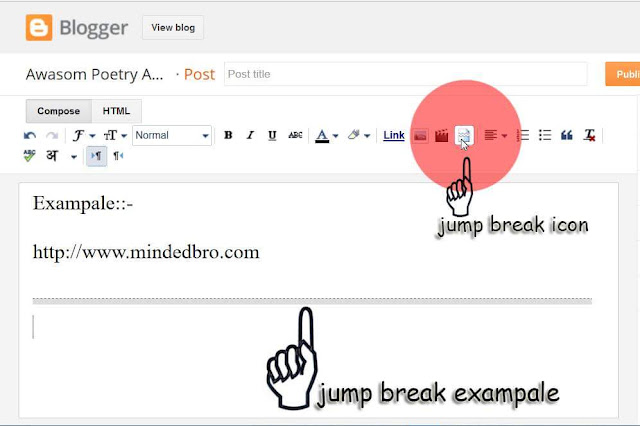
and then write your article then click insert jump break icon see below highlighted icon

Jump break in blog
Jump break in blog


now you successfully added jump break. enjoy fast loading blog !!!!!

Comment below for ask a question and must share by below G+,twitter,facebook and pinterest buttons !!!

 fastest internet speed-badhaaye apne internet ki speed
0

How to add Blogspot template ?-Add free blogger template in your blog

Blogspot template-free blogger template


Blogspot template tutorial-Add free blogger template-One Better template change your blog's atmosphere. it is highly recommended to use SEO friendly template in your blog. also News template is seo friendly template. read more below....[....]


 How to use Bluetooth in Computer without download any software ?-File transfer easily

How to get Free template
Check below websites for download free blogger templates


Download free templates from these five websites. it is recommended to use own blogger theme so i suggest you default blogger theme. i also using default blogspot template for MindedBro.com.

 
How to Add Template in Blog

Go to blogger>Template

Blogspot template-free blogger template


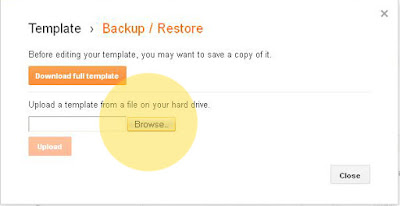
 Then Click backup/restore

Blogspot template-free blogger template


Then click browse and upload XML document file in to your downloaded template file

Blogspot template-free blogger template


Now you can use template. all process finished.....

Comment below for ask a question and must share by below G+,twitter,facebook and pinterest buttons !!!

 Beautiful india-Paanch esi baatey jo har bhartiy ko jarur jaanani chahiye-about indian culture

0

Moving Words with up direction and Background color-How to set up direction of moving text by HTML coding ?

Moving Words with up direction and background color
Moving Words with up direction and background color-In marquee left moving text is main and recommended direction but if you want to add up direction,you can change it to up direction by below method just follow it and try it for decorate your blog...[....]
History of comedy king kapil sharma-success story of kapil sharma aur ussey judi jivan ki sachhayi

How to Add up Direction
Go to blogger and then choose your blog. click new post and go to HTML and then past below code

<marquee bgcolor="#0000FF" direction="up">Minded Bro</marquee>


You can change background color. past your color code into bgcolor="#0000FF" and then you can add your favorite color.
You can see example here

Minded Bro


so this is the moving text with up direction and background color. enjoy friends !!!

New and easy way of earning money-earn money by GoDaddy Company by this two way
0

sitemaps-How to add sitemaps in blog ?-Add XML sitemap and HTML sitemap in your blog for seo-add XML site map in search console and HTML site map in blog

sitemaps
sitemaps
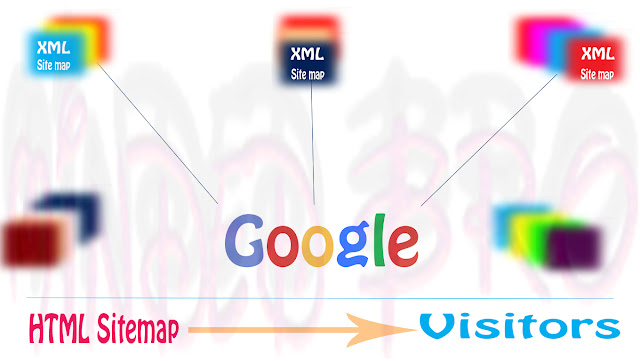
Sitemaps-Sitemap is a key of SEO. without sitemap you can't see more your blog in search engine. so,it's very important tool. increase your search traffic by sitemap. google easily find your articles. also add HTML site map in your blog....[....]
html marquee-aaj me aapko sikhaunga ki moving image url ke saath kese add kare?

How to add XML sitemap ?(for seo)
Sitemaps-XML sitemap improve your search result in google,bing etc and it is for SEO. Login to your account google search console. then click your blog url. if you do not added your blog yet then click add property and add your blog and verify it. after verification completed,go to crawl>sitemaps and then click add/test sitemap. Now Copy below link and past link into the box.
                                 atom.xml?redirect=false&start-index=1&max-results=500
this sitemap only for 500 article blog. if you have more than 500 articles then past below link.
                                 atom.xml?redirect=false&start-index=501&max-results=500
           if you have more articles then increase red highlighted number to 501,1001 etc........
  you are completed your step now follow below tips for add HTML sitemap. apply same tutorial in  bing(yahoo) webmaster tool done !!!

 
How to Add HTML sitemap ?(for visitors)
Sitemaps-HTML site map also help for improve your traffic rank and it is for visitors. Go to your blogger account and then go to pages. create new page and give the name "sitemap" in title bar.
and go to HTML and delete all words. then copy/past below code in html.  replace blogUrl: "http://www.mindedbro.com" to your Blog link.

<div dir="ltr" style="text-align: left;" trbidi="on">
<div id="tabbed-toc">
<span class="loading">Loading, please wait for a moment...</span></div>
<br />
<script type="text/javascript">
var tabbedTOC = {
    blogUrl: "http://www.mindedbro.com", // Enter your blog URL
    containerId: "tabbed-toc", // Container ID
    activeTab: 1, // The default active tab index (default: the first tab)
    showDates: false, // `true` to show the post date
    showSummaries: false, // `true` to show the posts summaries
    numChars: 200, // Number of summary chars
    showThumbnails: false, // `true` to show the posts thumbnails (Not recommended)
    thumbSize: 40, // Default thumbnail size
    noThumb: "", // A "no thumbnail" URL
    monthNames: [ // Array of month names
        "January",
        "February",
        "March",
        "April",
        "May",
        "June",
        "July",
        "August",
        "September",
        "October",
        "November",
        "December"
    ],
    newTabLink: true, // Open link in new window. `false` to open in same window
    maxResults: 99999, // Maximum post results
    preload: 0, // Load the feed after 0 seconds (option => time in milliseconds || "onload")
    sortAlphabetically: true, // `false` to sort posts by published date
    showNew: 7, // `false` to hide the "New!" mark in most recent posts or
 //define how many recent posts are to be marked by changing the number
    newText: " - <em style='color: white;padding: 1px 5px;border-radius: 20px;background-color: #F00;'>New!</em>" // HTML/CSS for
//the "New!" text
};
</script>
<script src="https://googledrive.com/host/0B_PLgWpOK_wTazVMekZ3TTBiY2M/" type="text/javascript"></script>
<style>
/*Sitemap  */
#tabbed-toc {
 width: 99%;
 margin: 0 auto;
 overflow: hidden !important;
 position: relative;
 color: #222;
 border: 0;
 border-top: 5px solid #FC0204;
 background-color: #1D1D1D;
 -webkit-transition: all 0.4s ease-in-out;
}
#tabbed-toc .loading {
 display:block;
 padding:5px 15px;
 font:normal bold 11px Arial,Sans-Serif;
 color:#FFF;
}
#tabbed-toc ul,
#tabbed-toc ol,
#tabbed-toc li {
 margin:0;
 padding:0;
 list-style:none;
 }
#tabbed-toc .toc-tabs {
 width: 24.8%;
 float: left !important;
}
#tabbed-toc .toc-tabs li a {
 display:block;
 font:normal bold 10px/28px Arial,Sans-Serif;
 height:28px;
 overflow:hidden;
 text-overflow:ellipsis;
 color:#ccc;
 text-transform:uppercase;
 text-decoration:none;
 padding:0 12px;
 cursor:pointer;
  -webkit-transition: all 0.3s ease-in-out;
}
#tabbed-toc .toc-tabs li a:hover {
 background-color: #515050;
 color: #FFF;
 }
#tabbed-toc .toc-tabs li a.active-tab {
 background-color: #FFFC03;
 color: #222;
 position: relative;
 z-index: 5;
 margin: 0 -2px 0 0;
}
#tabbed-toc .toc-content,
#tabbed-toc .divider-layer {
 width: 75%;
 float: right !important;
 background-color: #F5F5F5;
 border-left: 5px solid #FFFC03;
 -webkit-box-sizing: border-box;
 -moz-box-sizing: border-box;
 box-sizing: border-box;
 -webkit-transition: all 0.3s ease-in-out;
}
#tabbed-toc .divider-layer {
 float:none;
 display:block;
 position:absolute;
 top:0; right:0; bottom:0;
}
#tabbed-toc .panel {
 position:relative;
 z-index:5;
 font:normal normal 10px Arial,Sans-Serif;
}
#tabbed-toc .panel li a {
 display: block;
 position: relative;
 font-weight: bold;
 font-size: 11px;
 color: #222;
 line-height: 2.8em;
 height: 30px;
 padding: 0 10px;
 text-decoration: none;
 outline: none;
 overflow: hidden;
 -webkit-transition: all 0.3s ease-in-out;
}
#tabbed-toc .panel li time {
 display:block;
 font-style:italic;
 font-weight:400;
 font-size:10px;
 color:#666;
 float:right;
}
#tabbed-toc .panel li .summary {
 display:block;
 padding:10px 12px;
 font-style:italic;
 border-bottom:4px solid #275827;
 overflow:hidden;
}
#tabbed-toc .panel li .summary img.thumbnail {
 float:left;
 display:block;
 margin:0 8px 0 0;
 padding:4px;
 width:72px;
 height:72px;
 border:1px solid #dcdcdc;
 background-color:#fafafa;
}
#tabbed-toc .panel li:nth-child(even) {
 background-color: #DBDBDB;
 font-size: 10px;
}
#tabbed-toc .panel li a:hover,
#tabbed-toc .panel li a:focus,
#tabbed-toc .panel li a:hover time,
#tabbed-toc .panel li.bold a {
 background-color:#222;
 color:#FFF;
 outline:none;
 -webkit-transition: all 0.3s ease-in-out;
}
#tabbed-toc .panel li.bold a:hover,
#tabbed-toc .panel li.bold a:hover time {
 background-color:#222;
}
@media (max-width:700px) {
#tabbed-toc {
 background-color:#fff;
 border:0 solid #888;
}
#tabbed-toc .toc-tabs,
#tabbed-toc .toc-content {
 overflow:hidden;
 width:auto;
 float:none !important;
 display:block;
}
#tabbed-toc .toc-tabs li {
 display:inline;
 float:left !important;
}
#tabbed-toc .toc-tabs li a,
#tabbed-toc .toc-tabs li a.active-tab {
 background-color:#222;
 color:#ccc;
}
#tabbed-toc .toc-tabs li a.active-tab {
 color:#000;
}
#tabbed-toc .toc-content {
 border:none;
}
#tabbed-toc .divider-layer,
#tabbed-toc .panel li time {
 display:none;
}
}
</style></div>

Then change your setting. go to option and select 'Don't allow,hide exiting' in reader comment section and in compose mode select 'Show HTML literally' and in  line breaks select "Use <br> tag" then you are done all !!! all steps are completed.

if you have any question then post a comment and keep sharing !!!!
 keyword research tool-Easy and free way to get more traffic to your blog and website
1